NetBSD-UP 🚀
![]()
A simple command-line tool to start NetBSD virtual machines using QEMU with sensible defaults.
✨ Features
- 🖥️ Easy NetBSD VM setup: Launch NetBSD virtual machines with a single command
- 📥 Automatic ISO download: Downloads NetBSD ISO images from official CDN
- 🏷️ Version-aware: Specify NetBSD versions and automatically construct download URLs
- 🔄 Flexible input: Support for local ISO files, URLs, version numbers, or OCI registry images
- ⚙️ Configurable VM settings: Customize CPU, memory, cores, and disk options via CLI or configuration file
- ⚡ KVM acceleration: Automatically enables hardware virtualization for better performance
- 🌐 Port forwarding: Customizable port forwarding rules for network access
- 💻 Serial console: No GUI required - works entirely in terminal
- 🔧 VM Management: Start, stop, restart, inspect, remove, and list virtual machines
- 📊 VM Logging: Centralized logging with follow support for real-time monitoring
- 🔄 Background execution: Run VMs in detached mode for long-running tasks
- 💾 Persistent storage: SQLite database to track VM states and configurations
- 🏷️ Auto-naming: Automatic generation of unique VM names
- 🌉 Bridge networking: Support for custom network bridges
- 📦 OCI Registry Support: Pull, push, and tag VM images to/from OCI-compliant registries (GitHub Container Registry, Docker Hub, etc.)
- 🖼️ Image Management: List and remove local VM images
- 📝 Configuration File: Initialize and use
vmconfig.tomlfor persistent VM settings
📋 Requirements
- 🦕 Deno runtime
- 🖥️ QEMU with KVM support
- 📥
curlfor downloading ISO images
🚚 Installation
# Clone the repository
git clone https://github.com/tsirysndr/netbsd-up.git
cd netbsd-up

# Make it executable
chmod +x main.ts
Run the following command to install the CLI:
deno install -A -g -r -f jsr:@tsiry/netbsd-up🎯 Usage
⭐ Basic Usage
Start a NetBSD 10.1 VM with default settings:
netbsd-up🏷️ Specify NetBSD Version
netbsd-up 10.1
netbsd-up 9.3
📁 Use Local ISO File
netbsd-up /path/to/netbsd.iso🌐 Download from Custom URL
netbsd-up https://cdn.netbsd.org/pub/NetBSD/images/10.1/NetBSD-10.1-amd64.iso� Pull from OCI Registry
# Pull from GitHub Container Registry
netbsd-up ghcr.io/tsirysndr/netbsd:10.1

# Pull from Docker Hub
netbsd-up docker.io/username/netbsd:10.1
📋 Initialize Configuration File
Create a vmconfig.toml file with default settings:
netbsd-up initThen customize the file and start the VM:
netbsd-up�🔧 VM Management Commands
List all running VMs:
netbsd-up psList all VMs (including stopped):
netbsd-up ps --allStart a stopped VM:
netbsd-up start <vm-name>Start a VM in the background (detached):
netbsd-up start <vm-name> --detachStop a running VM:
netbsd-up stop <vm-name>Restart a VM:
netbsd-up restart <vm-name>Remove a VM:
netbsd-up rm <vm-name>View VM logs:
netbsd-up logs <vm-name>Follow VM logs in real-time:
netbsd-up logs <vm-name> --followInspect VM details:
netbsd-up inspect <vm-name>📦 OCI Registry Management
Login to a registry:
netbsd-up login ghcr.io -u username
# Or with Docker Hub
netbsd-up login docker.io -u username
Pull a VM image:
netbsd-up pull ghcr.io/tsirysndr/netbsd:10.1Push a VM image:
netbsd-up push ghcr.io/username/netbsd:10.1Tag a VM:
netbsd-up tag my-vm ghcr.io/username/netbsd:customRun a VM from an image:
netbsd-up run ghcr.io/tsirysndr/netbsd:10.1 --detachList local images:
netbsd-up imagesRemove a local image:
netbsd-up rmi ghcr.io/tsirysndr/netbsd:10.1Logout from a registry:
netbsd-up logout ghcr.io🖥️ Console Setup
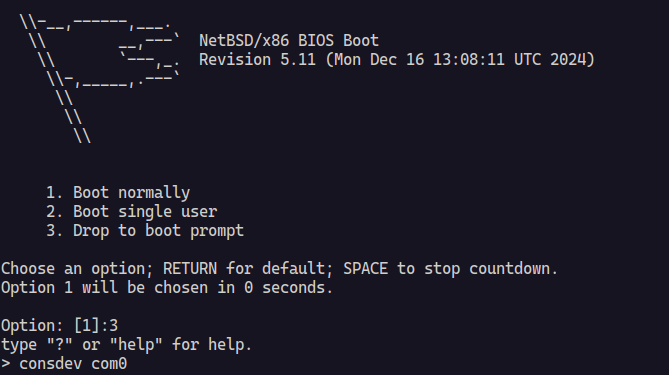
When NetBSD boots, you’ll see the boot menu. For the best experience with the serial console:
🔧 Select option
3. Drop to boot prompt⚙️ Configure console output:
consdev com0
boot
This enables proper console redirection to your terminal.
⚙️ Advanced Configuration
# Custom CPU, memory, and cores
netbsd-up --cpu host --memory 4G --cpus 4

# Save downloaded ISO to specific location
netbsd-up --output netbsd-10.1.iso

# Use existing disk image
netbsd-up --image vm-disk.img --disk-format qcow2

# Run VM in the background
netbsd-up --detach

# Custom port forwarding (SSH on port 2222, HTTP on port 8080)
netbsd-up --port-forward "2222:22,8080:80"

# Combine multiple options
netbsd-up --memory 8G --cpus 4 --detach --port-forward "3000:3000"
🛠️ Command Line Options
| Option | Short | Description | Default |
|---|---|---|---|
--output |
-o |
Output path for downloaded ISO | Auto-generated |
--cpu |
-c |
CPU type to emulate | host |
--cpus |
-C |
Number of CPU cores | 2 |
--memory |
-m |
Amount of VM memory | 2G |
--image |
-i |
Path to VM disk image | None |
--disk-format |
Disk image format | raw |
|
--size |
-s |
Size of the disk image to create if it doesn’t exist | 20G |
--bridge |
-b |
Name of the network bridge to use for networking (e.g., br0) | None |
--detach |
-d |
Run VM in the background and print VM name | false |
--port-forward |
-p |
Port forwarding rules (format: hostPort:guestPort) | None |
--install |
Persist changes to the VM disk image | false |
🔧 VM Management Commands
| Command | Description |
|---|---|
netbsd-up init |
Initialize a default VM configuration file |
netbsd-up ps |
List all running virtual machines |
netbsd-up ps --all |
List all virtual machines (including stopped) |
netbsd-up start <name> |
Start a stopped virtual machine |
netbsd-up start <name> -d |
Start a virtual machine in background (detached) |
netbsd-up stop <name> |
Stop a running virtual machine |
netbsd-up restart <name> |
Restart a virtual machine |
netbsd-up inspect <name> |
Show detailed information about a VM |
netbsd-up rm <name> |
Remove a virtual machine from database |
netbsd-up logs <name> |
View logs for a virtual machine |
netbsd-up logs <name> -f |
Follow logs in real-time |
netbsd-up pull <image> |
Pull VM image from OCI registry |
netbsd-up push <image> |
Push VM image to OCI registry |
netbsd-up tag <vm-name> <image> |
Tag a VM with an image name |
netbsd-up run <image> |
Create and run a VM from an image |
netbsd-up images |
List all local VM images |
netbsd-up rmi <image> |
Remove a local VM image |
netbsd-up login <registry> |
Authenticate to an OCI registry |
netbsd-up logout <registry> |
Logout from an OCI registry |
📚 Examples
⭐ Default NetBSD VM
netbsd-upStarts NetBSD 10.1 with 2 CPU cores and 2GB RAM.
🚀 High-Performance Setup
netbsd-up --cpus 8 --memory 8G --cpu host --detach🌐 Custom Port Forwarding
# SSH on port 2222, web server on port 8080
netbsd-up --port-forward "2222:22,8080:80"

# Development setup with multiple ports
netbsd-up --port-forward "3000:3000,5432:5432" --detach
💾 Development Environment with Persistent Disk
# Create a disk image first
qemu-img create -f qcow2 netbsd-dev.qcow2 20G

# Start VM with the disk
./main.ts --image netbsd-dev.qcow2 --disk-format qcow2
🔢 Specific versions
netbsd-up 10.1
netbsd-up 9.4
� OCI Registry Examples
# Pull and start a VM from GitHub Container Registry
netbsd-up ghcr.io/tsirysndr/netbsd:10.1

# Login to GitHub Container Registry
netbsd-up login ghcr.io -u username

# Tag an existing VM
netbsd-up tag my-vm ghcr.io/username/netbsd:custom

# Push the tagged VM to registry
netbsd-up push ghcr.io/username/netbsd:custom

# Run a VM from an image with custom settings
netbsd-up run ghcr.io/tsirysndr/netbsd:10.1 --memory 4G --cpus 4 --detach
📝 Configuration File Example
# Initialize a VM configuration file
netbsd-up init

# Edit vmconfig.toml to customize settings
# Then start the VM using the config
netbsd-up
Example vmconfig.toml:
[vm]
iso = "https://cdn.netbsd.org/pub/NetBSD/images/10.1/NetBSD-10.1-amd64.iso"
cpu = "host"
cpus = 4
memory = "4G"

[network]
port_forward = "2222:22,8080:80"

[options]
detach = true
�🔄 Background Operations
# Start VM in background
netbsd-up --detach

# Start existing VM in background
netbsd-up start my-vm --detach

# Monitor VM logs
netbsd-up logs my-vm --follow
🔧 VM Management Examples
# List all running VMs
netbsd-up ps

# List all VMs including stopped ones
netbsd-up ps --all

# Start a specific VM by name
netbsd-up start my-netbsd-vm

# Start a VM in the background
netbsd-up start my-netbsd-vm --detach

# Stop a running VM
netbsd-up stop my-netbsd-vm

# Restart a VM
netbsd-up restart my-netbsd-vm

# Get detailed information about a VM
netbsd-up inspect my-netbsd-vm

# Remove a VM from the database
netbsd-up rm my-netbsd-vm

# View VM logs
netbsd-up logs my-netbsd-vm

# Follow VM logs in real-time
netbsd-up logs my-netbsd-vm --follow
🖼️ Image Management Examples
# List all local VM images
netbsd-up images

# Remove a local VM image
netbsd-up rmi ghcr.io/tsirysndr/netbsd:10.1

# Pull a VM image from registry
netbsd-up pull ghcr.io/tsirysndr/netbsd:10.1

# Tag a VM for pushing to registry
netbsd-up tag my-vm ghcr.io/username/netbsd:custom

# Push a VM image to registry
netbsd-up push ghcr.io/username/netbsd:custom

# Logout from registry
netbsd-up logout ghcr.io
🌐 Networking
The VM supports flexible networking configurations:
🔌 Default Networking
- 🌐 QEMU’s user-mode networking (no special privileges required)
- 🔑 No default port forwarding (use
--port-forwardfor specific needs)
🔧 Custom Port Forwarding
Use the --port-forward option to map host ports to guest ports:
# SSH access on port 2222
netbsd-up --port-forward "2222:22"

# Multiple port mappings
netbsd-up --port-forward "2222:22,8080:80,3000:3000"
🌉 Bridge Networking
For advanced networking, use bridge mode (requires sudo):
netbsd-up --bridge br0📋 Version Format
NetBSD-UP recognizes version strings in the format:
- 🔢
MAJOR.MINOR(e.g.,10.1,9.3)
⚡ The tool automatically constructs the download URL for the official NetBSD release ISO.
⚙️ Default Settings
- 🏷️ NetBSD Version: 10.1
- 🖥️ CPU: host (uses host CPU features)
- 💾 Memory: 2GB
- ⚡ CPU Cores: 2
- 💿 Disk Format: raw
- 💾 Disk Size: 20GB (when creating new disk images)
- 🌐 Network: User-mode with SSH forwarding
- 🏷️ VM Names: Auto-generated unique names using random words
💾 Data Storage
NetBSD-UP uses a SQLite database (~/.netbsd-up/state.sqlite) to track virtual
machine states and configurations. The database stores:
- VM names and unique identifiers
- CPU, memory, and disk configurations
- Network settings (bridge, MAC addresses, port forwarding)
- Current status (RUNNING, STOPPED) with timestamps
- Creation and update timestamps
- Process IDs for running VMs
- Log file locations for each VM
📊 VM Logging
All VM output is automatically logged to ~/.netbsd-up/logs/<vm-name>.log. You
can:
- View logs:
netbsd-up logs <vm-name> - Follow logs in real-time:
netbsd-up logs <vm-name> --follow - Access logs directly from the filesystem
� OCI Registry Support
NetBSD-UP supports pulling and pushing VM images to OCI-compliant registries such as GitHub Container Registry (ghcr.io), Docker Hub (docker.io), and others. This enables sharing and distributing pre-configured NetBSD VMs.
🔐 Authentication
# Login to GitHub Container Registry
netbsd-up login ghcr.io -u username

# Login to Docker Hub
netbsd-up login docker.io -u username

# Logout from a registry
netbsd-up logout ghcr.io
📥 Pulling Images
# Pull from GitHub Container Registry
netbsd-up pull ghcr.io/tsirysndr/netbsd:10.1

# Start a VM directly from registry
netbsd-up ghcr.io/tsirysndr/netbsd:10.1

# Run a VM from an image with custom settings
netbsd-up run ghcr.io/tsirysndr/netbsd:10.1 --memory 4G --cpus 4
📤 Pushing Images
# Tag an existing VM
netbsd-up tag my-vm ghcr.io/username/netbsd:custom

# Push the tagged VM to registry
netbsd-up push ghcr.io/username/netbsd:custom
🖼️ Image Management
# List local images
netbsd-up images

# Remove a local image
netbsd-up rmi ghcr.io/tsirysndr/netbsd:10.1
📝 VM Configuration File
NetBSD-UP supports using a vmconfig.toml file for persistent VM
configuration. This is useful for reproducible VM setups.
Creating a Configuration File
netbsd-up initThis creates a vmconfig.toml file with default settings:
[vm]
iso = "https://cdn.netbsd.org/pub/NetBSD/images/10.1/NetBSD-10.1-amd64.iso"
cpu = "host"
cpus = 2
memory = "2G"

[network]

[options]
Using the Configuration File
Simply run netbsd-up in the directory containing vmconfig.toml:
netbsd-upCLI options will override configuration file settings.
�📄 License
See LICENSE file for details.
Contributing 🤝
Contributions are welcome! Please feel free to submit issues and pull requests.
Note
This tool is designed for development and testing purposes. For production NetBSD deployments, consider using proper installation methods.